What Makes Me Valerie
  • Welcome
    • Things I Love
    • General Blog
    • Disclosure
    • Contact
  • Over 50 Travel
  • Teatime With Valerie

Pallet Bottle Cap Collector

11/13/2015

0 Comments

 
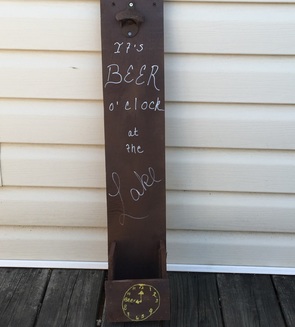
This was one of the first projects I ever did, and it's a great hit, especially down at the lake.  It's a bottle cap catcher, which is great for those afternoons spent on the deck with the cooler at your side!
Picture


Materials:
  • 2 pallet boards
  • Bottle opener (Rockler has a really cool brass one that will fade to an antique look, but I found the one in the picture for $.25 at a flea market)
  • Picture hanger
  • Stain (optional)
  • Paint (optional) / paint pens
  • Wood glue
  • Small wood nails or brads (like you find in a picture hanging kit)
  • Small screws for the bottle opening, hinge and picture hanger
  • Small hinge (not shown, but very  handy for opening the box)
Tools:
  • ​Saw (I used a mitre saw)
  • Sander
  • Drill
  • Screwdriver
  • Hammer or brad nail gun
Optional:
  • Clock mechanism
  • Bottle caps
  • Stencil(s)
To Do:
Cut one pallet board into 4 equal pieces.  Make sure the bottom piece is as wide as the uncut pallet board.
Stain or paint the uncut and the 4 cut pieces of pallet board
  • Once paint / stain are dry, decorate the front panel of the 4 smaller panels.  This will be the front of the box
    • If needed, attach the clock mechanism and hands to the panel using the directions for the mechanism

    • If wanted, use bottle caps for the front of the box  Affix them using either ceramic glue or screw them in using a small screw.
    • Use your imagination!  
  • Glue the bottom and the two sides of the box together.  Leavet he back side of the box open.  
  • Attach the front of the box using a small hinge of the left side of the front.  This will allow you to open the "door" to easily clean the caps. 
  • Screw the bottle cap opener near the top of the uncut pallet board.
  • Work on the design for the uncut pallet (for this one, I scripted, "It's Beer o'Clock at the Lake"). Be creative!
  • Once the box is dry, nail the box together using wire brads like these: affix it to the uncut pallet board with wood glue.  Set aside to dry.
  • Once dry, use small nails to attach the box to the pallet.  I turned it upside down so the nails came in from the back.
  • Attach the picture hanger on the back of the catcher.

Have fun and be creative with this project!  I did this behind my husband's
back, and he loved it when he saw it.  Here is a list of the products I used that can be purchased through our affiliate, Rockler.  I have highlighted the items you can find at Rockler, and I have the links listed below.


Picture
0 Comments

Pallet Signs

11/9/2015

0 Comments

 
I've been avoiding making pallet signs since I've been building with pallets.  I never thought I was creative enough, could letter well enough, was talented enough...the list is long why I denied myself this creative outlet.

A few weeks ago, I painted the girls' names on the hen house.  It was so pretty!  I thought, "Hmmmm...this could be okay..."  Then I painted Minnie's name along with hearts on her new dog house.  And it was CUTE!

The final straw came when I was at Michael's and I came across these adorable miniature wooden clothespins.  The creative juices started flowing, and before I knew it, I was making plans for a pallet sign.  Here is how I created a beautiful sign (and a Christmas gift for somebody I know....

Materials
  • 2 pallet boards
  • wood stain * (either regular stain and polyurethane or gel stain)
  • wax paper
  • printer
  • word processing program (I use Google Docs)
  • 12" small chain *
  • 4 cup hooks  *
Tools
  • reciprocating saw (sawzall)
  • sander

The first thing I did was disassemble a pallet using my sawzall.  That should have been easy, but I wasn't using the right blades, and it took 4 blades before I broke down and got a real blade.  That made it easier and I was ready to rock within about 10 minutes.

Next I sanded both sides of two pallets.  I tried to sand them as smoothly as possible without diminishing the personality of the wood.  I also sanded the skinny sides, which caused me to get a really pretty splinter under my wedding ring!

Once the boards were sanded smooth, it was time for the stain.  I wanted it to be a medium shade of wood, and my strokes were purposely uneven to give it a rustic look.  It took about half an hour to dry, and once it did, it was absolutely gorgeous.

I had a saying that I wanted on this particular sign, so I went inside, pulled up Google Docs, and typed the words.  I then played with the fonts; a fun childlike font on one part and an elegant, stately font for the second sign.  Once they were perfect, I printed them mirror image on a piece of wax paper.  To feed it evenly through the computer, I tacked it to a piece of regular printer paper using removable adhesive. Once it was printed, I cut the words apart and placed them  on the boards so that you could read the words correctly.  Holding tightly to the transfer, I took a straight edge and rubbed the words directly onto the wood.  It looked amazing!

I loved the lettering, but the coloring wasn't as striking as I wanted it to be.  Going back into my thought box, I grabbed a Sharpie and traced and colored the words.  It looked strikingly beautiful after that. About half an hour later, I used spray polyurethane to give it a special shine.

The next part of my project hasn't been finished, but it's something I've done before.  I will connect the two boards using cup hooks and about 5" of chain.  Finally, I will attach miniature clothespins, and place photos in the clips.

I really want to show you pictures of this project, but the person I'm giving it to may read the blog and may see it!  I do promise I will post a picture once this person receives the gift.  If you would like to see a picture beforehand, please email me and I will send it to you, along with these instructions.

By the way, I'd like to introduce Rockler.com.  Rockler is the premier internet woodworking and hardware store, and I'm thrilled about the opportunity to work with them!  They have a seriously amazing selection, and their prices are amazing.  I will periodically share savings opportunities with you.
Rockler
0 Comments

    Author

    Write something about yourself. No need to be fancy, just an overview.

    Archives

    December 2015
    November 2015

    Categories

    All

    RSS Feed

Proudly powered by Weebly