What Makes Me Valerie
  • Welcome
    • General Blog
    • Disclosure
    • Contact
  • Over 40 Travel
  • Teatime With Valerie
  • I Love Baseball

Pallet bench

12/11/2015

1 Comment


​***I dream of comfortable pallet furniture surrounding my fire pit.  Nights cuddled under blankets on these benches, watching the fire, roasting marshmallows, enjoying the stars.  Because I've wanted this so much, I always thought the furniture might be too difficult to build.

I was wrong!

I finished my weekend pallet project in just a few hours, so I was left with a day and a half with no projects!  What could I do?  Then I spotted my pallet piles.  And I saw two pallets nearly the same width.  I found a 2X4, and the project was on.  THIS would be the weekend I would create my pallet bench!

Materials:
2 equal width pallets (mine were 47" across)
4 equally cut 2X4s (mine were equally cut 26" each)
4 pallet boards barely shorter than your pallets are wide (mine were 45" long
2 pallet boards to use as arm rests.  Mine were longer and wider so I can rest a drink, my arm, etc.
2" screws

Tools:
Mitre saw
Reciprocating saw
Sander
Drill

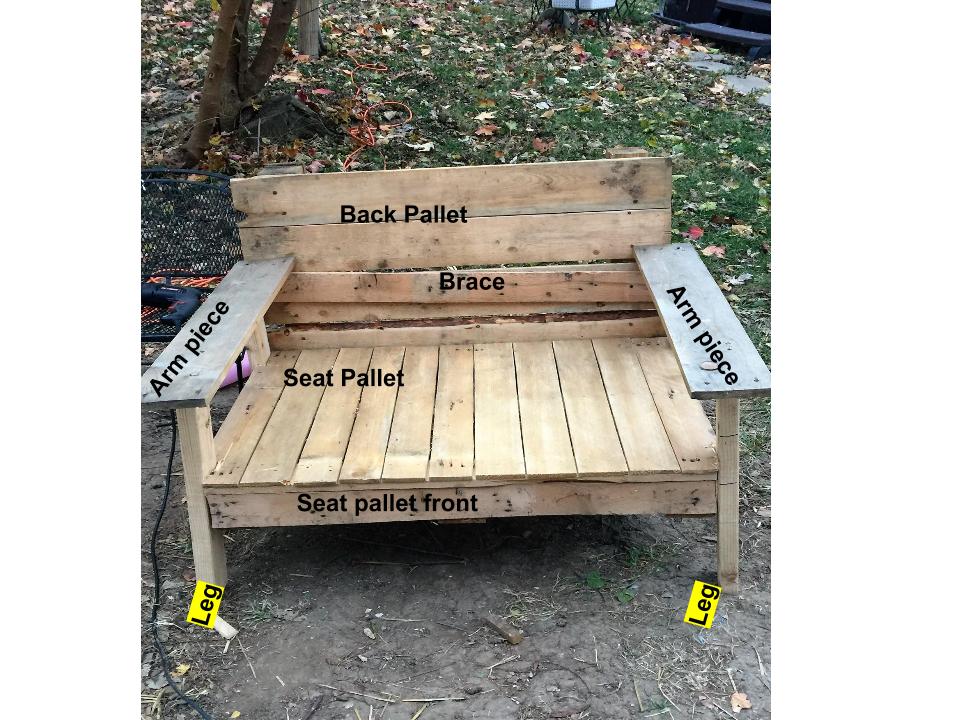
I have labeled the bench with the specific pieces below.  I hope it helps!  Please feel free to let me know any questions you have.

​To Do:
Your two pallets will be knows at your seat pallet and your back pallet.  The seat pallet is where you will be sitting, so use your pallet that has the boards closest together for the seat.  You will be more comfortable this way.  You can use any type of pallet for the back pallet.

Using your sander, sand the pallets as smooth as possible.  Pallet wood is not smooth.  I've gotten splinters from every single pallet project I've done, and I wear gloves!  I'm actually nursing a splinter from this project right now.  It may take some time, but when you can sit on your bench without getting splinters, you will be grateful you spent the time sanding.

Take one of your spare pallet boards and cut them to the width of your seat pallet using the mitre saw.  This will be the front of your seat pallet, where your legs will hang down.  Using two screws, drill this board into the front of the seat pallet.

Using your mitre saw, cut your 2X4 into 4 equal lengths.  These are the legs of your bench. My legs were 26" each.  Using 2 1/2" screws, drill the legs to the side of the seat pallet so that about 6" are actually on the ground, and the remainder is above the seat.  That is where you will attach the arm rests.  I had to use my reciprocating saw to create a notch in the seat pallet so that the leg could extend above the seat pallet.

Flip the seat pallet so that the backside is facing up.  Measure one of the spare pieces of pallet board to the proper length to fasten to the legs on top.  Drills that board across as a brace.

Place the back pallet so that the bottom is flush with the bottom of the seating pallet and the rest of the pallet is supported by the support brace.  Attach the back with 2 1/2" screws until stable.

Finally, flip the bench right side up.  Take the two remaining spare pallet boards and drill them to the 2X4s that are sticking up.  This will be your arm rest.  I used a wider pallet board to give me more room to place my computer, drink, or whatever!

I left my bench plain (so far) but it would be really pretty with some outdoor cushions, pillows, paint, stain...let your imagination run wild!
Picture
Picture
1 Comment

Pallet Bottle Cap Collector

11/13/2015

1 Comment

 
This was one of the first projects I ever did, and it's a great hit, especially down at the lake.  It's a bottle cap catcher, which is great for those afternoons spent on the deck with the cooler at your side!
Picture


Materials:
  • 2 pallet boards
  • Bottle opener (Rockler has a really cool brass one that will fade to an antique look, but I found the one in the picture for $.25 at a flea market)
  • Picture hanger
  • Stain (optional)
  • Paint (optional) / paint pens
  • Wood glue
  • Small wood nails or brads (like you find in a picture hanging kit)
  • Small screws for the bottle opening, hinge and picture hanger
  • Small hinge (not shown, but very  handy for opening the box)
Tools:
  • ​Saw (I used a mitre saw)
  • Sander
  • Drill
  • Screwdriver
  • Hammer or brad nail gun
Optional:
  • Clock mechanism
  • Bottle caps
  • Stencil(s)
To Do:
Cut one pallet board into 4 equal pieces.  Make sure the bottom piece is as wide as the uncut pallet board.
Stain or paint the uncut and the 4 cut pieces of pallet board
  • Once paint / stain are dry, decorate the front panel of the 4 smaller panels.  This will be the front of the box
    • If needed, attach the clock mechanism and hands to the panel using the directions for the mechanism

    • If wanted, use bottle caps for the front of the box  Affix them using either ceramic glue or screw them in using a small screw.
    • Use your imagination!  
  • Glue the bottom and the two sides of the box together.  Leavet he back side of the box open.  
  • Attach the front of the box using a small hinge of the left side of the front.  This will allow you to open the "door" to easily clean the caps. 
  • Screw the bottle cap opener near the top of the uncut pallet board.
  • Work on the design for the uncut pallet (for this one, I scripted, "It's Beer o'Clock at the Lake"). Be creative!
  • Once the box is dry, nail the box together using wire brads like these: affix it to the uncut pallet board with wood glue.  Set aside to dry.
  • Once dry, use small nails to attach the box to the pallet.  I turned it upside down so the nails came in from the back.
  • Attach the picture hanger on the back of the catcher.

Have fun and be creative with this project!  I did this behind my husband's
back, and he loved it when he saw it.  Here is a list of the products I used that can be purchased through our affiliate, Rockler.  I have highlighted the items you can find at Rockler, and I have the links listed below.


Picture
1 Comment

Pallet Signs

11/9/2015

0 Comments

 
I've been avoiding making pallet signs since I've been building with pallets.  I never thought I was creative enough, could letter well enough, was talented enough...the list is long why I denied myself this creative outlet.

A few weeks ago, I painted the girls' names on the hen house.  It was so pretty!  I thought, "Hmmmm...this could be okay..."  Then I painted Minnie's name along with hearts on her new dog house.  And it was CUTE!

The final straw came when I was at Michael's and I came across these adorable miniature wooden clothespins.  The creative juices started flowing, and before I knew it, I was making plans for a pallet sign.  Here is how I created a beautiful sign (and a Christmas gift for somebody I know....

Materials
  • 2 pallet boards
  • wood stain * (either regular stain and polyurethane or gel stain)
  • wax paper
  • printer
  • word processing program (I use Google Docs)
  • 12" small chain *
  • 4 cup hooks  *
Tools
  • reciprocating saw (sawzall)
  • sander

The first thing I did was disassemble a pallet using my sawzall.  That should have been easy, but I wasn't using the right blades, and it took 4 blades before I broke down and got a real blade.  That made it easier and I was ready to rock within about 10 minutes.

Next I sanded both sides of two pallets.  I tried to sand them as smoothly as possible without diminishing the personality of the wood.  I also sanded the skinny sides, which caused me to get a really pretty splinter under my wedding ring!

Once the boards were sanded smooth, it was time for the stain.  I wanted it to be a medium shade of wood, and my strokes were purposely uneven to give it a rustic look.  It took about half an hour to dry, and once it did, it was absolutely gorgeous.

I had a saying that I wanted on this particular sign, so I went inside, pulled up Google Docs, and typed the words.  I then played with the fonts; a fun childlike font on one part and an elegant, stately font for the second sign.  Once they were perfect, I printed them mirror image on a piece of wax paper.  To feed it evenly through the computer, I tacked it to a piece of regular printer paper using removable adhesive. Once it was printed, I cut the words apart and placed them  on the boards so that you could read the words correctly.  Holding tightly to the transfer, I took a straight edge and rubbed the words directly onto the wood.  It looked amazing!

I loved the lettering, but the coloring wasn't as striking as I wanted it to be.  Going back into my thought box, I grabbed a Sharpie and traced and colored the words.  It looked strikingly beautiful after that. About half an hour later, I used spray polyurethane to give it a special shine.

The next part of my project hasn't been finished, but it's something I've done before.  I will connect the two boards using cup hooks and about 5" of chain.  Finally, I will attach miniature clothespins, and place photos in the clips.

I really want to show you pictures of this project, but the person I'm giving it to may read the blog and may see it!  I do promise I will post a picture once this person receives the gift.  If you would like to see a picture beforehand, please email me and I will send it to you, along with these instructions.

By the way, I'd like to introduce Rockler.com.  Rockler is the premier internet woodworking and hardware store, and I'm thrilled about the opportunity to work with them!  They have a seriously amazing selection, and their prices are amazing.  I will periodically share savings opportunities with you.
Rockler
0 Comments

    Author

    Write something about yourself. No need to be fancy, just an overview.

    Archives

    December 2015
    November 2015

    Categories

    All

    RSS Feed

Proudly powered by Weebly